Ariens 991074-Max Zoom 52 Specifications Page 20
- Page / 36
- Table of contents
- BOOKMARKS
- Max Zoom 1
- TABLE OF CONTENTS 2
- INTRODUCTION 2
- PRODUCT REGISTRATION 3
- UNAUTHORIZED REPLACEMENT 3
- DISCLAIMER 3
- DEALER DELIVERY 3
- 1. DANGER! TO AVOID SERIOUS 5
- INJURY OR DEATH 5
- 2. DANGER! ROTATING PARTS 5
- EMISSION CONTROL SYSTEM 6
- SAFETY RULES 6
- ASSEMBLY 10
- CONTROLS AND FEATURES 11
- OPERATION 12
- FILLING FUEL TANK 14
- GASOLINE 14
- TO MOW WITH UNIT 15
- PRE-START 15
- STOPPING IN AN EMERGENCY 15
- STARTING AND SHUT OFF 15
- MOVING THE UNIT WITH THE 16
- ENGINE OFF 16
- FOR BEST PERFORMANCE 16
- MAINTENANCE SCHEDULE 17
- SERVICE AND ADJUSTMENTS 18
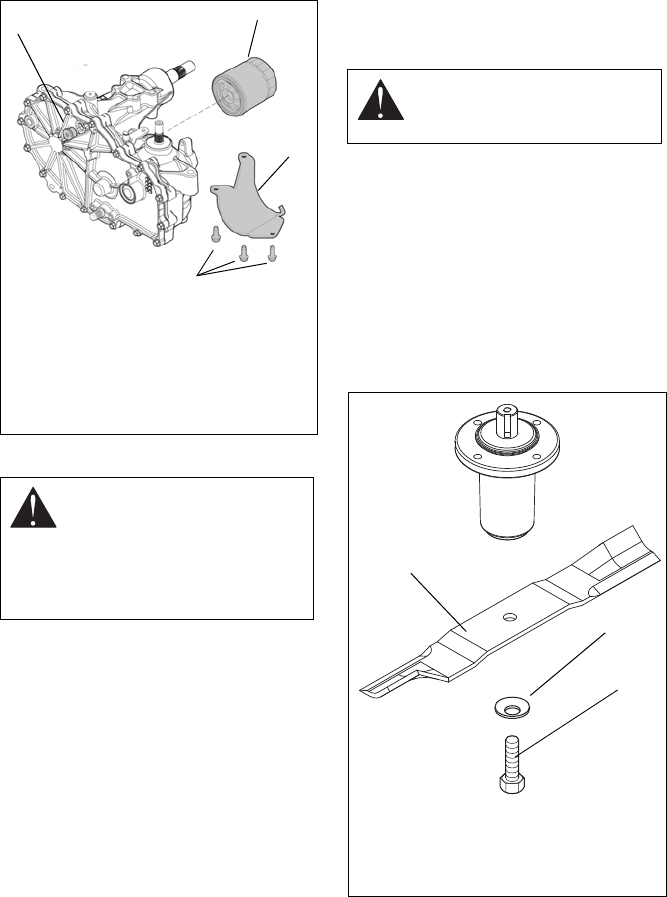
- HYDRAULIC FLUID 19
- MOWER BLADES 20
- Sharpen the Mower Blades 21
- Remove Battery 21
- Replace Battery 21
- Clean Battery 21
- LUBRICATE UNIT 22
- STEERING CONTROL NEUTRAL 22
- ADJUSTMENT 22
- Aligning the Steering Levers 23
- (Figure 14) 23
- PTO BELT 25
- Replacing the Hydro Pump Belt 26
- MOWER DECKS 27
- Leveling the Mower Deck 28
- Check Blade Level and Pitch 28
- CLUTCH ADJUSTMENT 29
- ACCESSORIES 30
- SERVICE PARTS 30
- SPECIFICATIONS 31
- Con_Ride_2011 32
- Two-Year Limited Lawn and 32
- Garden Consumer Ride-On 32
- Warranty 32
- CARB_EPA_2011 34
Related products and manuals for Utility Vehicle Ariens 991074-Max Zoom 52
 (36 pages)
© 2020, manymanuals.com. All rights reserved. | 0.236 s |
 Manymanuals.com
 Manymanuals.de
 Manymanuals.fr
 Manymanuals.it
 Manymanuals.pl
 Manymanuals.cz
 Manymanuals.es
 Manymanuals-pt.com
Comments to this Manuals